Introduction#
Kubernetes has become the de facto standard for container orchestration. However, for many developers, the concepts of deployments and services can be confusing at first.
Basic Concepts#
Deployment#
A deployment in Kubernetes is a set of instructions that defines how a group of pods should be created, run, and maintained within the cluster.
Essentially, it is the way you can tell the cluster:
I want my application to always be available, with a specific number of replicas.
Features#
- Automatic failure handling (restart of failed pods)
- Horizontal scalability (more replicas as demand increases)
- Stabilty (rolling updates1 and rollbacks2)
Service#
When a deployment is used to dynamically create, delete, or replace pods, there is no straightforward way to know how many pods are active or how many are in a healthy state. This is why services become a powerful tool for exposing an application running across one or more pods in a cluster, even when those pods are running on different nodes.
Creating a Deployment#
Next, we will create a deployment named hello-app-deployment, which will be configured to start a single pod consisting of a container running Google’s hello-app image. We will also define CPU and RAM limits, as well as expose port 8080 on each pod.
We create a file named hello-app-deployment.yaml with the following content:
apiVersion: apps/v1
kind: Deployment
metadata:
  name: hello-app-deployment
  labels:
    app: hello
spec:
  replicas: 1
  selector:
    matchLabels:
      app: hello
  template:
    metadata:
      labels:
        app: hello
    spec:
      containers:
        - name: hello-app
          image: us-docker.pkg.dev/google-samples/containers/gke/hello-app:1.0
          ports:
            - containerPort: 8080
          resources:
            requests:
              cpu: "250m"
              memory: "64Mi"
            limits:
              cpu: "250m"
              memory: "128Mi"
 1apiVersion: apps/v1
 2kind: Deployment
 3metadata:
 4  name: hello-app-deployment
 5  labels:
 6    app: hello
 7spec:
 8  replicas: 1
 9  selector:
10    matchLabels:
11      app: hello
12  template:
13    metadata:
14      labels:
15        app: hello
16    spec:
17      containers:
18        - name: hello-app
19          image: gcr.io/google-samples/hello-app:1.0
20          ports:
21            - containerPort: 8080
22          resources:
23            requests:
24              cpu: "250m"
25              memory: "64Mi"
26            limits:
27              cpu: "250m"
28 memory: "128Mi"Apply the changes
# kubectl apply -f hello-app-deployment.yaml
deployment.apps/hello-app-deployment created
Check the status of the deployment
# kubectl get deployments
NAME                   READY   UP-TO-DATE   AVAILABLE   AGE
hello-app-deployment 1/1 1 1 30mREADY column, we can see that the number of replicas is 1.We can also get detailed information about the deployment using the describe command
# kubectl describe deployment hello-app-deployment
Name:                   hello-app-deployment
Namespace:              default
CreationTimestamp:      Wed, 04 Jun 2025 18:07:05 -0500
Labels:                 app=hello
Annotations:            deployment.kubernetes.io/revision: 1
Selector:               app=hello
Replicas:               1 desired | 1 updated | 1 total | 1 available | 0 unavailable
StrategyType:           RollingUpdate
MinReadySeconds:        0
RollingUpdateStrategy:  25% max unavailable, 25% max surge
Pod Template:
  Labels:  app=hello
  Containers:
   hello-app:
    Image:      us-docker.pkg.dev/google-samples/containers/gke/hello-app:1.0
    Port:       8080/TCP
    Host Port:  0/TCP
    Limits:
      CPU:     250m
      memory:  128Mi
    Requests:
      CPU:         250m
      memory:      64Mi
    Environment:   <none>
    Mounts:        <none>
  Volumes:         <none>
  Node-Selectors:  <none>
  Tolerations:     <none>
Conditions:
  Type           Status  Reason
  ----           ------  ------
  Progressing    True    NewReplicaSetAvailable
  Available      True    MinimumReplicasAvailable
OldReplicaSets:  <none>
NewReplicaSet:   hello-app-6d4c4c8966 (1/1 replicas created)
Events:          <none>
Let’s slightly modify the file hello-app-deployment.yaml to increase the number of replicas to 3.
 1apiVersion: apps/v1
 2kind: Deployment
 3metadata:
 4  name: hello-app-deployment
 5  labels:
 6    app: hello
 7spec:
 8  selector:
 9    matchLabels:
10      app: hello
11  template:
12    metadata:
13      labels:
14        app: hello
15    spec:
16      replicas: 3
17      containers:
18      - name: hello-app
19        image: gcr.io/google-samples/hello-app:1.0
20        ports:
21        - containerPort: 8080
22        resources:
23            requests:
24              CPU: "250m"
25              memory: "64Mi"
26            limits:
27              CPU: "250m"
28              memory: "128Mi"
Apply the changes
# kubectl apply -f hello-app-deployment.yaml
deployment.apps/hello-app-deployment configured
Check the status of the deployment.
As we can see, the value in the READY column changed from 1/1 to 3/3.
# kubectl get deployments
NAME        READY   UP-TO-DATE   AVAILABLE   AGE
hello-app   3/3     3            3           44m
We can also see the created pods
# kubectl get pods
NAME                                    READY   STATUS    RESTARTS   AGE
hello-app-deployment-6d4c4c8966-7rx67   1/1     Running   0          71m
hello-app-deployment-6d4c4c8966-sjclg   1/1     Running   0          71m
hello-app-deployment-6d4c4c8966-wdzsb   1/1     Running   0          115m
Defining a Service#
We have successfully created a deployment, but how do we access it? We could access it using port forwarding; however, we will expose our application using a service configured as follows:
Our service will group the pods that have the
applabel set tohello, and it will also expose port 8000 externally to access thehello-app-deployment.
We create a file named hello-app-service.yaml with the following content:
 1apiVersion: v1
 2kind: Service
 3metadata:
 4  name: hello-app-service
 5  labels:
 6    app: hello
 7spec:
 8  selector:
 9    app: hello
10  ports:
11    - port: 8000
12      targetPort: 8080
13 type: LoadBalancerLoadBalancerApply the changes
# kubectl apply -f Kubernetes/hello/hello-app-service.yaml
service/hello-app-service created
Check the status of the deployment
# kubectl get services
NAME                TYPE           CLUSTER-IP      EXTERNAL-IP   PORT(S)          AGE
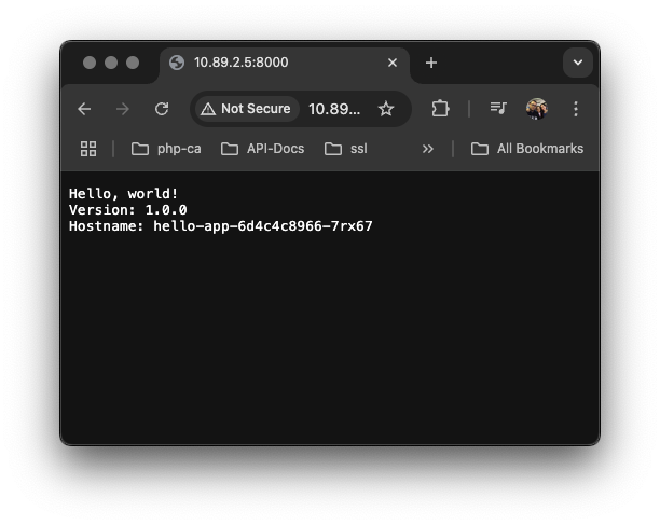
hello-app-service   LoadBalancer   10.96.175.173   10.89.2.5     8000:30513/TCP   40s
Finally, we access the service using the external IP that has been assigned to it.

Allows deployments to be updated with zero downtime by incrementally replacing old Pods with new ones. https://kubernetes.io/docs/tutorials/kubernetes-basics/update/update-intro/ ↩︎
Allows reverting a Pod or group of Pods to a previous state. https://kubernetes.io/docs/concepts/workloads/controllers/deployment/#rolling-back-a-deployment ↩︎

